
 内核驱动模型、内核模块LKM:
# 内核驱动模型、内核模块LKM:
Owner: -QVQ-
内核开发没有libc库,标准头文件,所以不能用c语言封装的函数例如printf(用kprintf)等等(在驱动不用c库是为了速度和大小),应使用GNU C。
需要关注的特性:
- inline.C99标准引入
- 内联汇编:asm volatile(…)
- 分支声明:if产生的分支时,告诉CPU哪个分支是大概率出现的,以帮助CPU作优化 likely、unlikely
void func1(int i){
		if(likely(i > 8)){//标注这个分支大概率出现
			i=1;
			printk("%d",i);
		}else{
			i=2;
			printk("%d",i);
		}
}
void func2(int i){
		if(unlikely(i > 8)){//告诉CPU这个分支大概率不会执行
			i=10;
			printk("%d",i);
		}else{
			i=2;
			printk("%d",i);
		}
}
1
2
3
4
5
6
7
8
9
10
11
12
13
14
15
16
17
18对其编译后得到的汇编语言
Dump of
assembler code for function func1:
0x00000000000001c0 <+0>: callq 0x1c5 <func1+5>
0x00000000000001c5 <+5>: push %rbp
0x00000000000001c6 <+6>: cmp $0x8,%edi //比较i与8
0x00000000000001c9 <+9>: mov %rsp,%rbp
0x00000000000001cc <+12> jle 0x1e1<func1+33> //小于等于时跳转到0x1e1
0x00000000000001ce <+14> mov $Oxa,%esi
0x00000000000001d3 <+19>: mov $Ox0,%rdi
0x00000000000001da <+26>: callq 0x1df <func1+31>
0x00000000000001df <+31>: pop %rbp
0x00000000000001e0 <+32>: retq
0x00000000000001e1 <+33>: mov $Ox2,%esi//跳到这里
0x00000000000001e6 <+38>: mov $0x0,%rdi
0x00000000000001ed <+45>: callq 0x1f2<func1+50>
0x00000000000001f2 <+50>: pop %rbp
0x00000000000001f3 <+51>: retq
End of assembler dump.
(gdb)disass func2
Dump of assembler code for function func2:
0x0000000000000200 <+0>: callq 0x205<func2+5>
0x0000000000000205 <+5>: push %rbp
0x0000000000000206 <+6>: cmp $Ox8,%edi//比较i与8
0x0000000000000209 <+9>: mov %rsp,%rbp
0x000000000000020c <+12>: jg 0x221<func2+33>//大于等于时跳转到0x221
0x000000000000020e <+14>: mov $Ox2,%esi
0x0000000000000213 <+19>: mov $Ox0,%rdi
0x000000000000021a <+26>: callq 0x21f<func2+31>
0x000000000000021f <+31>: pop %rbp
0x0000000000000220 <+32>: retq
0x0000000000000221 <+33>: mov $Oxa,%esi//跳到这里
0x0000000000000226 <+38>: mov $Ox0,%rdi
0x000000000000022d <+45>: callq  0x232<func2+50>
0x0000000000000232 <+50> pop %rbp
0x0000000000000233 <+51>: retq
1
2
3
4
5
6
7
8
9
10
11
12
13
14
15
16
17
18
19
20
21
22
23
24
25
26
27
28
29
30
31
32
33
34
35在编译结果中两者均为小概率时发生跳转。(CPU在执行时需要提前作环境的部署,如果发生跳转需要重新部署环境,从而降低性能)这里均为向高地址跳转,x86结构的CPU预测大概率不会发生跳转,因此将大概率发生的代码放到跳转指令后,小概率发生的代码放到跳转目标后。从而达到对编译器作提示从而优化
CPU在对循环语句编译时会预测向低地址发生跳转
注意新的电脑在使用分支预测时在生成的汇编代码中常常不会生效,原因未知
没有内存保护机制
不用轻易用浮点数
用户态使用浮点操作,内核会完成从整数模式到浮点数操作的转换(通过捕获陷阱),内核开发需要人工保存恢复浮点寄存器
函数调用栈很小(默认情况下,64位时,栈大小为8KB)
因此不要使用局部数组、不要使用递归调用
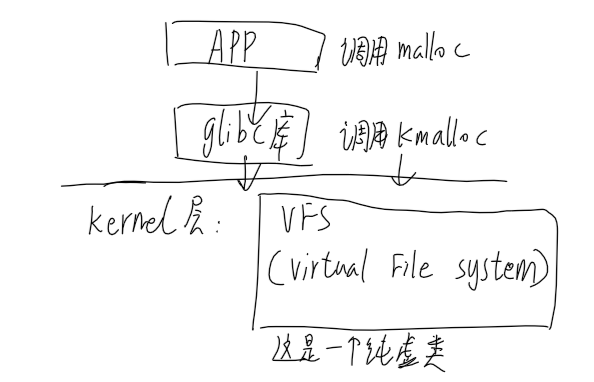
VFS
Linux sysfs 是一个虚拟的文件系统(VFS),(路径/sys下为设备驱动模型中各个组件的层次关系),它把连接在系统上的设备和总线组织成为一个分级的文件,可以由用户空间存取,向用户空间导出内核数据结构以及它们的属性。
/lib/modules/$(shell uname -r)目录下存放了各种编译号的内核模块、符合信息等
其中:
kernel目录包含各个内核模块
build往往是一个符号链接,指向的目录包含了内核头文件,用于编译内核模块的各个makefile,其中build/makefile里是编译顶层的makefile文件,包含了KERNELRELEASE的定义
当在Linux系统中创建一个文件时就会在文件系统中创建一个inode结构体与之对应,inode结构体代表一个文件在文件系统中的存在,包含文件的元数据(例如文件权限,所有者等),以及数据块的指针。多次打开同一文件不会产生多个inode,所有打开的文件都close时,inode在内存中被释放。
file结构体代表一个打开的文件,包含了对应inode结构体的指针,以及其他一些用于文件操作的信息。
一个文件在文件系统中只对应一个inode结构体,但可以有多个打开的文件,每个打开的文件对应一个file结构体,它们通过inode结构体建立联系。
分类:(数据结构定义详见 linux/device.h)
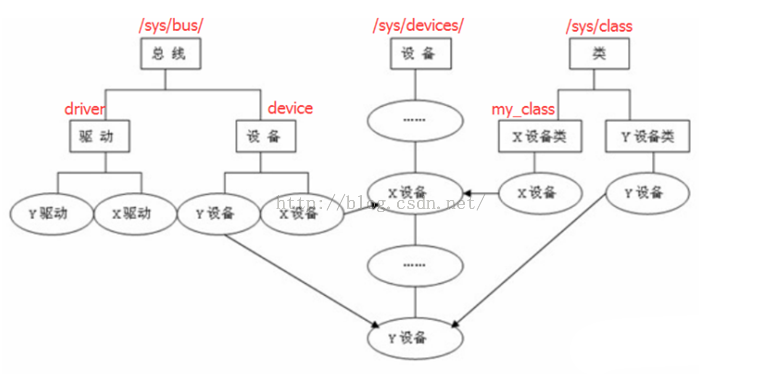
设备(device)(字符设备驱动、块设备驱动和网络设备驱动) struct device描述设备
/proc/devices 文件里记录了所有的设备,第一列是主设备号,第二列是设备名
**总线(bus) :**struct bus_type描述总线
cpu总线式管理驱动,(首先创建一些总线,如USB总线,pci总线,然后操作系统管理好总线就可以,由总线来管理驱动。)
总线还分两个分支,驱动和设备,设备之间、驱动之间由链表连起来,那么所有的设备来注册,比如插了一个热插拔usb设备,系统就将设备添加到usb总线设备里面去,然后到驱动的链表下面去找,安装相应的驱动。
platform总线的注册
**类(class):**struct class 和 struct class_device
意义在于作为同属于一个class的多个设备的容器。
类(目的就是为了对各种设备进行分类管理)和bus多重管理设备,不同的思路和管理方法。比如摄像头和U盘在bus角度看都是USB设备,但是在class角度看一个是大容量存储设备,一个是摄像头。
class在分类的同时还对每个类贴上了一些“标签”,这也是设备驱动模型为我们写驱动提供的基础设施。 sys/devices才是真正的设备,从class或bus进去,最终都会指向devices目录下。
**驱动(driver):**struct device_driver描述驱动
设备和对应的驱动必须依附于同一种总线,因此 device_driver和 device结构中都包含 struct bus_type指针。
内核模块特性
装入的内核模块和其他内核部分一样,具有相同的访问权限,因此,差的内核模块会导致系统崩溃
为了使内核模块访问所有内核资源,内核必须维护符号表,并在装入和卸载模块时修改这些符号表
有些模块要求利用其他模块的功能,因此,内核要维护模块之间的依赖性
内核必须能够在卸载模块时通知模块,并且要释放分配给模块的内存和中断等资源
内核版本和模块版本的不兼容,也可能导致系统崩溃,因此,严格的版本检查是必需的
| 功能项 | OS | Kernel | | --- | --- | --- | | 关系 | OS必然包含kernel方能运行 | Kernel可以成为OS一部分,没有OS时,Kernel能独立运行 | | 目标 | 服务与应用程序 | 服务于上层程序 | | 功能 | 为应用程序提供良好的运行机制及环境,同时提供各种统一的资源接口 | 以CPU资源为核心,进行各种任务调度和通讯机制,并且协同各种模块一道服务于上层(OS) |
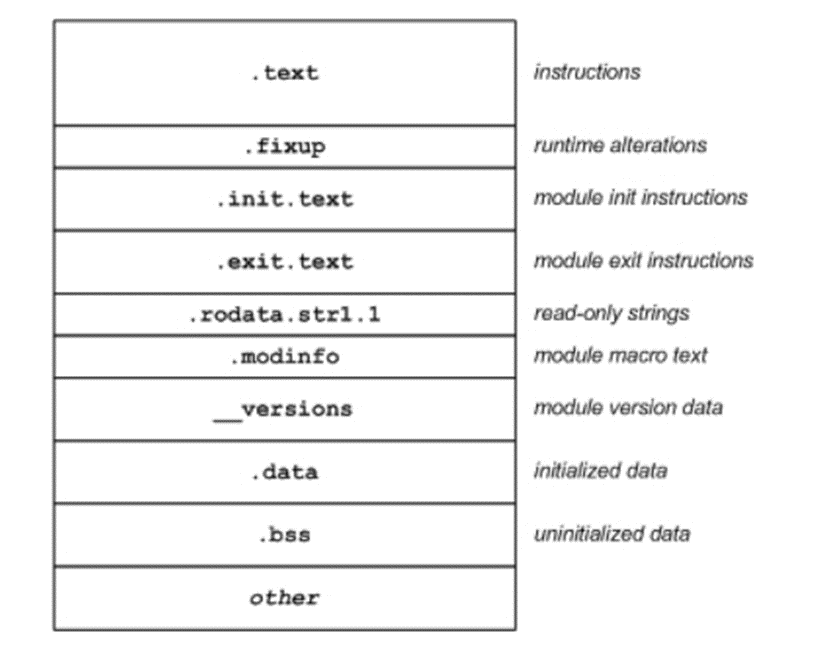
LKM 是一个特殊的可执行可链接格式(Executable and Linkable Format,ELF)对象文件。(通常,必须链接对象文件才能在可执行文件中解析它们的符号和结果)。由于必须将 LKM 加载到内核后 LKM 才能解析符号,所以 LKM 仍然是一个 ELF 对象。
例如,如果在 LKM 上使用 objdump 实用工具,会发现一些熟悉的区段(section),比如 .text(说明)、.data(已初始化数据)和 .bss(块开始符号或未初始化数据)。
具有ELF区段的LKM的示例
内核模块的生命周期
用户空间中,insmod(插入模块)启动模块加载过程。insmod 命令定义需要加载的模块,并调用 init_module 用户空间系统调用,开始加载过程。init_module 函数通过系统调用层,进入内核到达内核函数 sys_init_module。这是加载模块的主要函数。
rmmod 命令会使 delete_module 执行 system call 调用,
delete_module 最终会进入内核,并调用 sys_delete_module 将模块从内核删除。
在模块的加载和卸载期间,模块子系统维护了一组简单的状态变量,用于表示模块的操作。加载模块时,状态为 MODULE_STATE_COMING。如果模块已经加载并且可用,状态为 MODULE_STATE_LIVE。此外,卸载模块时,状态为 MODULE_STATE_GOING
Linux可以随意动态的加载与写在操作系统部件,我们可以在系统启动后任何时候把驱动模块动态挂载到内核中,而我们不再需要某个模块时又可以将它从内核模块卸载和删除,这就是动态模块加载。
驱动的执行方式:
驱动程序现在VFS中注册,注册是指将函数的地址告诉他。如何应用程序触发这些函数的执行
VFS是一个纯虚类,相当于所有驱动的基类,定义了所有驱动设备接口的规范。
在用户层有一个write函数,那么内核层也就要有一个write函数
字符类设备的代码实现:
一个设备号由主设备号和次设备号构成。用 dev_t 类型( 32位无符号整数)的变量进行标识,高12位表示主设备号,低20位表示次设备号。
主设备号对应设备驱动程序,同一类设备一般使用相同的主设备号。
次设备号描述该驱动的设备的序号,由驱动程序使用,序号一般从 0 开始。
关于设备号,内核提供了几个宏定义和函数
<include/linux/kdev_t.h>
MAJOR(dev) 从设备号 dev 中提取主设备号。
MINOR(dev) 用来从设备号 dev 中提取次设备号。
MKDEV (ma,mi)将主设备号 ma 和 次设备号 mi 组合成 dev_t 类型的设备号
<include/linux/fs.h>
/* 获取次设备号 */ static inline unsigned iminor(const struct inode *inode)
/* 获取主设备号 */ static inline unsigned imajor(const struct inode *inode)
注册字符设备号
方法一:
register_chrdev函数能实现快速注册
方法二:
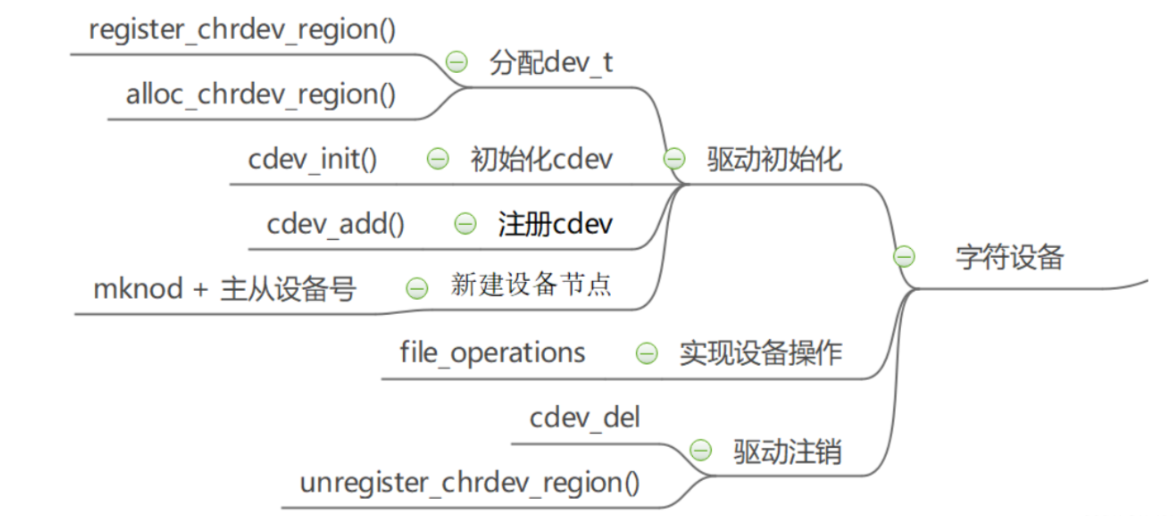
首先分配设备号,下面两个分别为静态分配(需要指定设备号)和动态分配(系统自动分配设备号),
int register_chrdev_region(dev_t from, unsigned count, const char *name)
注册一系列连续的字符设备号,主设备号需要函数调用者指定
from 为设备编号,包含主设备号和次设备号
count 用于指定连续设备号的个数,即当前驱动程序所管理的同类设备的个数。
name 为设备或驱动的名字
成功返回0,失败返回错误码
int alloc_chrdev_region(dev_t *dev, unsigned baseminor, unsigned count, const char *name)
注册一系列连续的字符设备号,主设备号是由内核动态分配得到
dev 为函数的输出值,记录动态分配的设备号,如果申请多个设备号,则此参数记录这些连续设备号的起始值
baseminor 指定首个次设备号
count 用于指定连续设备号的个数
name 为设备或驱动的名字。
成功返回0,失败返回错误码
初始化,将文件操作加载到设备中
void cdev_init(struct cdev *cdev, struct file_operations *fops)
将文件操作加载到设备
cdev:设备的结构体指针
fops:文件操作的结构体指针
int cdev_add(struct cdev *dev, dev_t num, unsigned int count);
将设备挂载到系统中
- dev是cdev结构的指针,也就是驱动文件。
- num是这个设备相应的第一个设备号。
- count是应当关联到设备的设备号的数目。
卸载
void unregister_chrdev_region(dev_t from, unsigned count)
释放主次设备号
- from:要释放的设备号。
- count:表示从 from 开始,要释放的设备号数量。
注意:如果我们是用的struct cdev slCharDevice,那么直接使用cdev_init即可,如果是struct cdev* slCharDevice,那么需要slCharDevice= cdev_alloc()完成内存申请,然后再用cdev_init
这里的cdev结构体实际上就是一个device
创建设备类型、注册设备节点
1.手动创建
mknod /dev/chardev c 10 0在/dev路径下创建一个名字为chardev的字符设备节点,主设备号为10,次设备号为0。
当我们使用上述命令,创建了一个字符设备文件时,实际上就是创建了一个设备节点 inode 结构体,并且将该设备的设备编号记录在成员 i_rdev,将成员 f_op 指针指向了 def_chr_fops 结构体(并不是自己构造的 file_operation,而是字符设备通用的 def_chr_fops)。这就是 mknod (用户空间的glibc库)负责的工作内容。
2.自动创建
创建设备类型
class_create()
#define class_create(owner, name) \ ({ \ static struct lock_class_key __key; \ __class_create(owner, name, &__key); \ })宏定义,创建设备类型
注册设备节点
struct device *device_create(struct class *class, struct device *parent, dev_t devt, void *drvdata, const char *fmt, ...)
- class:该设备依附的类。
- parent:父设备。
- devt:设备号(主次设备号)。
- drvdata:私有数据。
- fmt:设备名。
例如:
device_create(chrdev_class, NULL, MKDEV(dev_major, 0), NULL, DEV_NAME); */*/dev/chrdev 注册这个设备节点*/*
注销设备类型
void class_destroy(struct class *cls)
注销设备节点
device_destroy()
创建字符类设备
分文件编写时的注意
DriverMain.h
我们可以用一个SLDriverParameters结构体来管理设备号,驱动文件,设备类
#ifndef DriverMain_H
#define DriverMain_H
#define DEVICE_NAME "msg_printer"

struct SLDriverParameters
{
	struct class *pslDriverClass;//设备类
	dev_t uiDeviceNumber;//设备号
	struct cdev slCharDevice;//驱动文件
};

extern struct SLDriverParameters gslDriverParameters;

#endi
1
2
3
4
5
6
7
8
9
10
11
12
13
14DriverMain.c
struct SLDriverParameters gslDriverParameters = {0};

struct file_operations gslNvmDriverFileOperations ={
}
int InitalizeCharDevice(void)
void UninitialCharDevice(void)

static int DriverInitialize(void)
static void DriverUninitialize(void)
module_init(DriverInitialize);
module_exit(DriverUninitialize);
1
2
3
4
5
6
7
8
9
10
11
DriverFileOperations.c和DriverFileOperations.h实现file_operations内需要挂载的函数具体实现
例子
//DriverMain.h
#ifndef DriverMain_H
#define DriverMain_H

#include <linux/init.h>
#include <linux/module.h>
#include <asm/mtrr.h>
#include <linux/device.h>
#include <linux/mm.h>
#include <linux/cdev.h>
#include <linux/slab.h>

#define DEVICE_NAME "msg_printer"
//建立一个结构体对该驱动的资源管理
struct SLDriverParameters
{
	struct class *pslDriverClass;//设备类
	dev_t uiDeviceNumber;//下面这个设备对应的设备号
	struct cdev slCharDevice;//设备的驱动程序
};

extern struct SLDriverParameters gslDriverParameters;

#endif
1
2
3
4
5
6
7
8
9
10
11
12
13
14
15
16
17
18
19
20
21
22
23
24//DriverMain.c #include "DriverMain.h" #include "DriverFileOperations.h" #include "ToolFunctions.h" MODULE_LICENSE("Dual BSD/GPL"); struct SLDriverParameters gslDriverParameters = {0}; struct file_operations gslNvmDriverFileOperations = { .owner = THIS_MODULE, .open = DriverOpen, .release = DriverClose, .read = DriverRead, .write = DriverWrite, .unlocked_ioctl = DriverIOControl, .mmap = DriverMMap, }; int InitalizeCharDevice(void) { //用于函数报错的调试 int result; struct device *pdevice; //动态获取1个从0开始的设备号 result = alloc_chrdev_region(&(gslDriverParameters.uiDeviceNumber), 0, 1, DEVICE_NAME); if(result < 0) { printk(KERN_ALERT DEVICE_NAME " alloc_chrdev_region error\n"); return result; } //创建设备类 gslDriverParameters.pslDriverClass = class_create(THIS_MODULE, DEVICE_NAME); if(IS_ERR(gslDriverParameters.pslDriverClass)) { printk(KERN_ALERT DEVICE_NAME " class_create error\n"); result = PTR_ERR(gslDriverParameters.pslDriverClass); goto CLASS_CREATE_ERROR; } //将file_operation结构体挂载到设备里,即打开关闭一类具体操作函数的挂载 cdev_init(&(gslDriverParameters.slCharDevice), &gslNvmDriverFileOperations); gslDriverParameters.slCharDevice.owner = THIS_MODULE; //将驱动文件注册到系统,和设备号关联起来 result = cdev_add(&(gslDriverParameters.slCharDevice), gslDriverParameters.uiDeviceNumber, 1); if(result < 0) { printk(KERN_ALERT DEVICE_NAME " cdev_add error\n"); goto CDEV_ADD_ERROR; } //注册设备节点,将设备类和设备号关联起来 pdevice = device_create(gslDriverParameters.pslDriverClass, NULL, gslDriverParameters.uiDeviceNumber, NULL, DEVICE_NAME); if(IS_ERR(pdevice)) { printk(KERN_ALERT DEVICE_NAME " device_create error\n"); result = PTR_ERR(pdevice); goto DEVICE_CREATE_ERROR; } return 0; DEVICE_CREATE_ERROR: cdev_del(&(gslDriverParameters.slCharDevice)); CDEV_ADD_ERROR: class_destroy(gslDriverParameters.pslDriverClass); CLASS_CREATE_ERROR: unregister_chrdev_region(gslDriverParameters.uiDeviceNumber, 1); return result; } void UninitialCharDevice(void) { device_destroy(gslDriverParameters.pslDriverClass, gslDriverParameters.uiDeviceNumber); cdev_del(&(gslDriverParameters.slCharDevice)); class_destroy(gslDriverParameters.pslDriverClass); unregister_chrdev_region(gslDriverParameters.uiDeviceNumber, 1); } static int DriverInitialize(void) { DEBUG_PRINT(DEVICE_NAME " Initialize\n"); return InitalizeCharDevice(); } static void DriverUninitialize(void) { DEBUG_PRINT(DEVICE_NAME " Uninitialize\n"); UninitialCharDevice(); } module_init(DriverInitialize); module_exit(DriverUninitialize);1
2
3
4
5
6
7
8
9
10
11
12
13
14
15
16
17
18
19
20
21
22
23
24
25
26
27
28
29
30
31
32
33
34
35
36
37
38
39
40
41
42
43
44
45
46
47
48
49
50
51
52
53
54
55
56
57
58
59
60
61
62
63
64
65
66
67
68
69
70
71
72
73
74
75
76
77
78
79
80
81
82
83
84
85
86
87
88
89
90
91
92
93
94
95
96
97
98
99
100
101
102
103
104
105//DriverFileOperations.h //DriverFileOperations.c //实现具体的驱动执行函数 ……1
2
3
4模块加载与调试
插入模块
insmod 模块名.ko卸载模块
rmmod 模块名.ko查看内核调试信息dmesg清空内核调试信息
dmesg --clear重装模块组合技
rmmod *.ko; dmesg --clear; insmod *.ko ;dmesg查看模块信息
modinfo 模块名查看当前系统安装的模块
lsmod出现SMAP问题
SMAP/SMEP:Supervisor Mode Access Prevention(管理模式访问保护),禁止内核对用户空间的访问

在CR4寄存器中,第20位和21位为SMAP/SMEP的标识位,0表示关闭1开启。
注意这个寄存器只在较新的电脑才有,如果是老电脑没有这个寄存器,则不需要下面的操作,内核空间可以直接读取用户空间的值。
通过copy_from_user和copy_to_user函数封装了stac函数,即先关闭AC标识,再访问数据,再关闭SMAP
以下两种写法是一样的,均能实现在内核空间中从用户空间的ulArg指针中得到值
int a;
//从用户态之间打印出程序的地址
int* ulArg = 具体的用户态地址;
stac();//EFLAGS.AC = 1
a = *((int __user *)ulArg);//访问
clac();//EFLAGS.AC = 0
1
2
3
4
5
6copy_from_user(&a, (int __user *)ulArg, sizeof(int))) {1对于全局变量的读写
一个进程通过open和close打开关闭驱动模块,驱动模块内的全局变量依然保存,再次打开这个文件时依然可以读取这个全局变量的值
每次有应用程序请求打开内核模块时,都会调用加载file_operations的open函数,关闭模块都会加载file_operations的close函数。所以如果要想一个进程通过驱动模块写入,一个进程通过驱动模块读取,则不能在open和close里对全局变量作初始操作。
遇到的问题
在编译时,这个函数
copy_from_user(&a, (int __user *)ulArg, sizeof(int))发生报错,././include/linux/compiler_types.h:289:20: warning: ‘asm’ operand 2 probably does not match constraints././include/linux/compiler_types.h:289:20: error: impossible constraint in ‘asm’
解决:makefile文件里将优化级别从-O0改成-O2
分析:The trouble above was caused by extended assembly in arch/x86/include/asm/cpufeature.h, where the modifiers of the operand 0 and 2 were i, meaning that immediate integers were expected. But they both used parameter bit, which was a variable instead of a constant. If -O2 was specified, the inline function _static_cpu_has was expanded with a constant in place of parameter bit, which bypassed the restriction.
编译时重复定义
报错大致内容如下
DriverFileOperations.o:DriverMain.h:34: multiple definition of `gslDriverParameters'; DriverMain.o:DriverMain.h:34: first defined here
解决:
在.c文件中定义struct类型的变量,在.h文件中用extern关键字去修饰声明
即:
.c中:
struct listnode *Linknode = NULL;.h中:
extern struct listnode *Linknode;注意不要在.h定义时初始化,如下也是会报错重复定义的
.h中:
extern struct listnode *Linknode = NULL;函数传入的指针记得初始化
static struct listnode *add_temp;
copy_from_user(add_temp, (struct listnode __user *)ulArg, sizeof(struct listnode)
//add_temp没有初始化就传入函数内,会编译失败,先给指针分配空间
//这样写太麻烦,所以直接用引用最方便,如下
static struct listnode add_temp;
copy_from_user(&add_temp, (struct listnode __user *)ulArg, sizeof(struct listnode)
1
2
3
4
5
6ioctl控制函数中_IOR第三个参数只能是变量类型
在用ioctl传入参数时,如果需要传入数组,应当写成结构体,传入结构体指针,而不是数组指针
//这样效率较低
int *c = (int)malloc(8);
c[0] = 1;
c[1] = (int)'+';
ioctl(fd,NODE_IOCTL_INSTRL,c);//内核读取数据后用同样的规则访问两个数据

//用结构体
struct a{
   int a1;
   char a2;
}
struct a c = {1,'+'};
ioctl(fd,NODE_IOCTL_INSTRL,c);//内核读取数据后用同样的规则访问两个数据
1
2
3
4
5
6
7
8
9
10
11
12
13
14
# 动态模块及模块间通信
模块初始化可以设定或模块之间调用,可使用module_param()和EXPORT_SYMBOL_GPL()
实现:
模块一中,在模块初始化函数内,定义全局函数指针变量,令其指向模块运算函数,最后导出全局指针变量到全局符号表
模块二中,新增一个动态模块。该动态模块调用被导出的函数指针,间接调用动态模块中的函数
模块一中,EXPORT_SYMBOL(函数名)命令导出函数指针
模块二中,extern声明函数即可使用